The SUB Instructions | Setup The SUB in 5 steps
The SUB Beer Tap setup
Pub quality poured pints every time!
With The SUB, you get the quality and freshness of a perfectly poured draught beer, at home. Setting up and using your SUB is simple, plug in and you're ready to pour.
We also have some FAQs, including troubleshooting and product details at the end.
Setting up is easy
As mentioned setting up is very simple, and the small footprint enables you to make any countertop a bar in an instant. Follow the five-step instructions and you’ll be pouring pints like a pro in no time. Or, make it even easier, and watch it in action. Watch it in the video!
Krups SUB instructions
Krups are the manufactures of The SUB. At Beerwulf, we have all the information you could possibly need to get going. It's the easiest beer tap to fire up, no difficult installation, just plug in and you're ready to pour.

1. Pre-chill your SUB Kegs
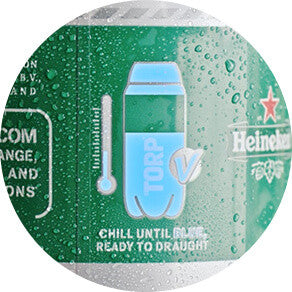
Pre-chill your SUB Kegs for 6-10 hours before you want to load your beer into The SUB*. This means your beer is chilled as soon as you are ready to use The SUB and you can start tapping at optimum temperature, reducing waiting time. The indicator on the keg will turn blue when ready.
Plug in your appliance at least an hour before desired serving time until the light turns green to get the best beer possible.
*Please note, we advise you not to put your kegs in the freezer! This could damage your keg or beer.

2. Attach the tube
This step is very important, pay extra attention!
Remove the plastic dispensing lid from your keg. Inside you will find the connector tube.
Take this tube and insert it into the mouth of your SUB Keg. It is imperative you push hard until you hear it click into place.
Firmly check the valve to ensure it has been inserted properly and attached securely before loading your keg into The SUB. It can cause damage to the kegs and machine if this is not done correctly.

3. Insert the SUB Keg
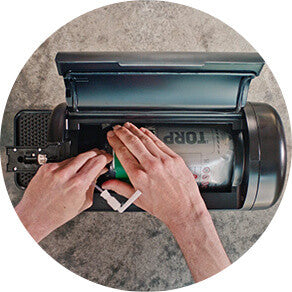
Open the lid on the top of the cylindrical unit, lift the cover over the tap and insert the keg into The SUB. You want to put the bottom end into the chamber first.
Make sure to use your pre-chilled SUB Keg. You can view the full keg selection here. We have over 30 premium beers to load your SUB with.

4. Connect the tube
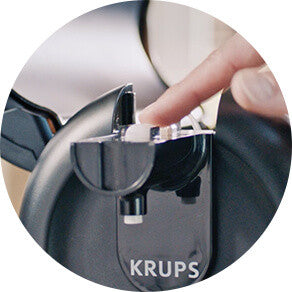
Feed the SUB Keg’s tube through the pouring end of the tap head. Place the tube's spout inside the tap head and click it back into position.
There are sections to slot the parts into place, it will become clear when you open the tap head.

5. Close The SUB
Close and lock the door of your SUB. The kegs should sit comfortably in the refrigerated unit, you shouldn't have to force the door. If the door does not close easily, check the keg has been inserted properly. It may not be pushed far enough into the chamber. Once the light of the appliance turns green, you can start pouring!
Want to see how it looks in action? Watch The SUB video!
I have plugged in The SUB and connected a keg. When I can start tapping?
Once the beer is chilled to the right temperature, the light on the front of The SUB will turn green. The beer is at the optimum temperature and can now be tapped.
Do I have to wait until it turns green?
Pouring before the keg is fully chilled will produce a lot of foam. It won't harm you, but we don't recommend it. For the optimum experience, it is best to wait.
Should the device remain switched on all the time during use?
When there is beer in the keg it should remain on to keep the beer chilled and fresh for 15 days. This will also keep the correct pressure. If the chamber is empty, you can turn the appliance off.
How long does it take to cool a SUB Keg?
We advise pre-chilling your kegs for 6-8 hours in the fridge before use. If appliance and keg are at room temperature it will take around 10 hours to cool.
How do I load a SUB Keg into The SUB?
Remove the top of the keg sleeve along the dotted line. Then remove the cap and take the tube out. Push the tube into the opening until you hear a "click" sound, this is very important. Now slide the SUB Keg into the cooling chamber, make sure it goes right to the end. Then open the tap cover and guide the tube into place. Snap the beer valve in its position in the tap head. Close the tap cover, close and lock The SUB door and you're done.
Where should The SUB be placed?
The small footprint means it will fit on any countertop. Place it on a flat, clean and dry surface with access to main supply. We also advise customers to leave enough space around the machine, to make sure that it can cool.
How to setup the SUB?
Read our step by step guide
What is the volume of a SUB Keg?
The kegs hold 2 litres of beer.
What is the size of The SUB?
The SUB is 45.5 cm x 23.5 cm x 32.6 cm and weighs 6.8 kg
What are dimensions of The SUB Compact?
THE SUB Compact is 45.3cm (excluding drip tray) x 19cm x 37.5cm (l x h x d) and
weighs 4.45kg
Is The SUB battery powered?
No, The SUB plugs into the mains power with a 90cm power cable. It’s extremely energy-efficient with a rating of A+.
Is it easy to draught beer from the tap?
The SUB makes it very easy to tap pub quality beers from your home.
Read our step by step guide
My SUB light is red
This usually means the kegs are cooling. If you pre-chill your kegs before use, this will be a lot quicker. If the appliance and keg are at room temperature it can take 10 hours to cool.
If the red light persists, try pouring a little beer. This might trigger it to turn green.
When I try to tap a beer, I only get foam. How did that happen?
There can be several causes of this:
- Sometimes the first glass you tap can largely be foam
- Sometimes the tube will fill with gas if you haven't drawn the beer through the tube yet
- If the temperature of the beer is too warm or too cold
- The beer is not tapped correctly: To tap, you must open the tap handle quickly and pull it down fully. Tilt the clean glass at a 45° degree angle, keeping the glass close to the tap.
Is it normal to get a glass full of foam with the first tap?
Yes, the first glass from a new keg will primarily be foam, so don't panic. However, if the amount of foam is the same in the next, it is possible the keg is not cold enough.
Can I adjust the temperature of the drink?
No, the appliance will chill the beer to 2° C.
Krups SUB is making noise, is this ok?
Indeed, it does make a humming sound when it is cooling. It can also make a similar noise when it is pressurising and when you are draughting a beer.
What do I do if the light won't turn on?
Once in the machine, a SUB Keg takes 10 to 16 hours (depending on starting temperature). When your beer is chilled to the right temperature, then the light on the front will turn green. To expediate the process, you can pre chill your kegs in the fridge.
The temperature of the SUB Keg depends on the temperature in the fridge and how long it has been in the machine. If the temperature of the room is above 30 °C and the SUB Keg has not been pre-chilled, it can happen that the light does not turn green. The temperature of the beer in this case is within 2 – 6 °C and still cooling. Be patient, it can take a bit of time.
What do I do if the machine is not working?
After following the instructions in the manual and reading our steps, ensure that your electrical socket is working by testing it with another appliance in. If it still does not work, do not try to dismantle or repair the appliance yourself, instead, contact customer support.